Last Updated on April 23, 2025 by Doris Jean
The LOC Method, LCO Method, and Curly Girl Method were created to save us curlies. At times we can feel at war with our hair and for us with curly hair, the war just lasts a little bit longer. But that doesn’t mean there’s no hope! When it feels like your hair would sell fast as a highly-absorbent mop, the light at the end of the kurly, kinky tunnel can seem dim.
We’ve all been there, and every time you try something new, it gives you a brief spark of hope before drying out again – this is usually when you contemplate shaving it all off. Fortunately, you don’t have to. Don’t even think of it!

Many 4a, 4b, and 4c curlies have been through this before and cleverly streamlined a few hair care routines that work. It’s all in the science, baby!
So, after years of testing, experimenting, and almost pulling their hair out with frustration, we have the LOC, LCO, and Curly girl Method.
Related Articles:
The LOC Method
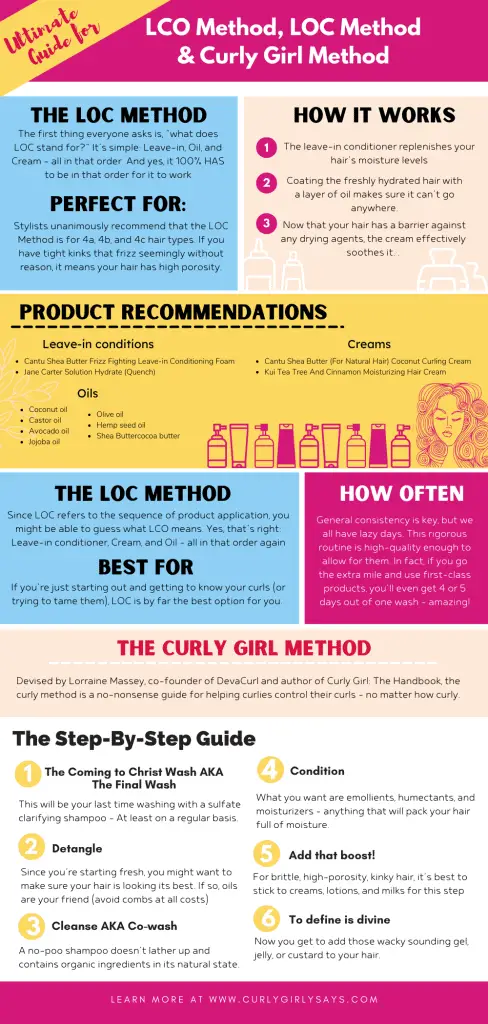
The first thing everyone asks is, “what does LOC stand for?” It’s simple: Leave-in, Oil, and Cream – all in that order. And yes, it 100% HAS to be in that order for it to work. Speaking of working, who does this method work for?
What type of hair suits the LOC method?
Stylists unanimously recommend that the LOC Method is for 4a, 4b, and 4c hair types. If you have tight kinks that frizz seemingly without reason, it means your hair has high porosity.
While this is great for soaking up moisture fast, it also lets it all out the same way it came in. Fast in and Fast out!
For low porosity hair, moisture has a really hard time penetrating the hair shaft. It really gives moisture a run for its money! Some naturalistas believe that the LCO Method works best for low porosity hair.
So moving along…
How does the LOC method work?
The carefully planned out order of application allows the products to essentially seal off these pores. Firstly, the leave-in conditioner replenishes your hair’s moisture levels. Following swiftly on, coating the freshly hydrated hair with a layer of oil makes sure it can’t go anywhere.
Now that your hair has a barrier against any drying agents, the cream effectively soothes it. Think of the cream as the icing on the highly-moisturized cake. In short, the LOC method could even be called the LOCK method since it’s all about locking in moisture and throwing away the key.
What products will I need?
It’s likely that if you’ve been wrangling with your hair for some time now, that you’ll already have everything you need on hand. But if you’re looking to start anew, here are the recommended products for each step:
Leave-in conditioners:
- Cantu Shea Butter Frizz Fighting Leave-in Conditioning Foam
- Jane Carter Solution Hydrate (Quench)
Keep the leave-in conditioner light since you will be using a cream.
Oils:
- Coconut oil
- Castor oil
- Avocado oil
- Jojoba oil
- Olive oil
- Hemp seed oil
- Shea Butter
- cocoa butter
Creams:
- Cantu Shea Butter (For Natural Hair) Coconut Curling Cream
- Kui Tea Tree And Cinnamon Moisturizing Hair Cream
What are the benefits of the LOC method?
Leaving aside the fact that it’s optimized for moisture retention and will give your hair a gorgeous healthy sheen, the LOC method is also believed to promote hair growth. If applied (as recommended) around the roots of the hair and along the scalp, the hair can be soothed before it’s even seen the light of day.
So, this hair care routine is also considered preventative since it limits damage to the hair and stimulates growth. The consistency of the routine allows for length retention also.
Now, let’s talk about the LCO Method.
The LCO Method
Most of the LCO method guidelines hold true to the LOC method. You just use the products in a slightly different order. Since LOC refers to the sequence of product application, you might be able to guess what LCO means. Yes, that’s right: Leave-in conditioner, Cream, and Oil – all in that order again.
Some people argue that this method makes more sense. They claim that since your hair’s cuticles are wide-open after conditioning, it’s best to get the creamy moisture in next. Naturally, for them, the next step should be the oily sealant to polish it all off and trap the moisture.
Really, the main decider is whether you’re new to natural hair or not. If you’re just starting out and getting to know your curls (or trying to tame them), LOC is by far the best option for you. However, if you’re a creature of habit and have been following the LCO method for years without even thinking, it’s best to stick with it.
Either way, all you need to know is that both methods are very effective. It all depends on your hair porosity and how well it reacts to each of the routine’s components. Why not go wild and try them both? If your hair doesn’t follow the rules, why should you!?
Try both methods to find out which one is the perfect fit for your lovely curly hair!
How often will I have to do the LOC or LCO method?
As often as you wash your hair is a good rule of thumb but missing a wash or two every now and then isn’t the end of the world. General consistency is key, but we all have lazy days. This rigorous routine is high-quality enough to allow for them. In fact, if you go the extra mile and use first-class products, you’ll even get 4 or 5 days out of one wash – amazing!
And finally –
Curly Girl Method Steps
Devised by Lorraine Massey, co-founder of DevaCurl and author of Curly Girl: The Handbook, the curly method is a no-nonsense guide for helping curlies control their curls – no matter how curly.
Here are the sacred rules:
- Avoid products with silicones, sulfates, alcohol, and artificial fragrance
- Don’t use combs or brushes
- Step away from the heat styling tools
- Don’t use a regular towel on your hair
- Use protein-rich products
- Use moisturizing ingredients
The #1 rule of the Curly Girl Method is avoiding products with silicons, sulfates, alcohol, and artificial fragrances at all costs!
Tweet
Curly Girl Method Step by Step Guide
Once you’ve learned what not to do, you have to learn what TO DO. Let’s take a look at how the curly method works step for step:
The Coming to Christ Wash AKA The Final Wash
This will be your last time washing with a sulfate clarifying shampoo – At least on a regular basis.
Consider this step as your baptism into the healthy natural curl world. What you’re doing here is washing away any products you’ve previously used on your hair.
Yes, stripping your hair clean and going back to basics can be daunting, but the curly girl method has your back. So, don’t worry, and go buy yourself a silicon-free, sulfate shampoo that will leave no trace behind.
Tip: Keep this shampoo on hand. Resets are an inevitability.
Detangle
Since you’re starting fresh, you might want to make sure your hair is looking its best. If so, oils are your friend (avoid combs at all costs). Oils are kind, gentle, and won’t leave you half-bald and in abject pain. Plus, oils are always a bonus, right?
Now that you have been baptized, from this point forward you will follow the below steps. Welcome, you have been born again!
Cleanse AKA Co-wash
What do you call a shampoo without sulfates, silicones, drying alcohols, and parabens? A conditioner. And that’s exactly what you should be using to wash your hair from now on. It’s a little-known fact, but conditioner is exceptionally good at gently taking grime and oil from hair without overdoing it. Maybe you have visions of greasy or unwashed hair that feels like conditioner – forget them. Why? Because it works.
Or, if the co-wash is a bit much right now, why not opt for the low-poo or no-poo shampoos? A low-poo lathers up slightly and uses curly girl safe commercial, cleansing ingredients (but always check to be on the safe side.) Low-poo is suited to wavier, less-tight curls that are of low porosity.
A no-poo shampoo doesn’t lather up and contains organic ingredients in its natural state. This softer shampoo is suited to dryer, curly, and kinky-coily hair.
Condition
Dreaded silicons have a tendency to sneak in during this step, so be sure to check all labels. What you want are emollients, humectants, and moisturizers – anything that will pack your hair full of moisture. Whether it be a general conditioner, leave-in conditioner, or deep conditioner – Whatever works best for you is your best bet.
Add that boost!
Now it’s time to give those freshly hydrated curls life! For brittle, high-porosity, kinky hair, it’s best to stick to creams, lotions, and milks for this step. However, mousse or foams are also bona fide curl enhancers.
To define is divine
Here’s the fun part. Now you get to add those wacky sounding gel, jelly, or custard to your hair. While it’s tempting to skip this step, don’t even think about it. This is where your curls come out of their shell and become the star of the show. Think of it like dressing your curls up for a night out. Once you’re done, they won’t leave the door for any less than a million bucks.
Anyhow, after hearing all these wonders, it can be tempting to stockpile. Go wild! All you need to do is avoid Glycerin. This humectant has somehow found its way to the top of the list of many gels and is a pesky frizz causer.
The final touch
What really makes your curls come to life is knowing what order they need these steps to be in. So, the curly girl method is sort of a process of elimination that can take some time, but it’s worth it in the end!
Last word …
And voila! Your curls should be ready to bounce throughout the day. Try using a microfiber towel to scrunch out some of the excess moisture rather than resorting to rough towels or hairdryers.
Getting your curls just right generally requires copious amounts of moisture – enough moisture to drown small village levels of moisture. Fortunately, the tried & tested methods listed above are proved to pack a hydrating punch and hold the finish!
So, why not try something new or tweak your hair-care routine from the inspiration above? Your hair will thank you!





I enjoyed looking at the products for natural hair. I will be ordering very soon.
I’m so happy that you enjoyed looking at the products! Yes, totally worth checking out.